Allow me to introduce the 800 pound gorilla, WordPress. For those of you that are unaware, WordPress has grown in the past several years into a critical tool for marketing online. WordPress has the innate ability to publish articles onto a website quickly and easily. At first, WordPress was used primarily for blogs. As it has evolved, however, business owners tweaked it into a traditional content management system.
These days, you’ll find WordPress being used for blogs, product launches, local business websites, intranets, project management and anything else involving a web-based presence. In this brief article, I’m going to explain how you can use WordPress to build a killer sales funnel on a product website.
The Essential Pages
As a product owner, you need certain basic pages in your website’s funnel. These include the following:
- Optin page
- Confirmation page
- Thank you page
- Sales page
- One-time offer page
- Download page
WordPress can create all of these for you quickly and easily. Here’s the kicker, though, some themes aren’t equipped to deliver these types of pages. In particular, some themes only have sidebars that unfortunately, distract the order process.
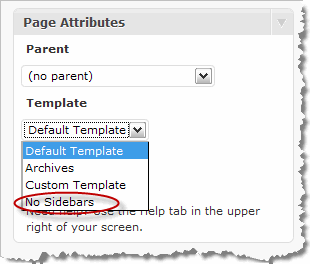
On the bright side, most premium themes already come with a one column, full width page template. This is the page template will be using. To see if your theme has one, login to WordPress and visit the administrators area. Pretend you’re going to write a new page, and on the right sidebar look for a page template called full width, no sidebars, one column or similar wording. The screenshot below is from a Thesis installation which includes this template by default. The default WordPress theme “Twenty Ten” also contains this type of page template.

If you see it, you’re good to go.
The Essential Plug-ins
You might have seen these before. In particular, the Google XML site map plug-in should be in current use. It’s purpose is to create a sitemap.xml file with all your site’s posts/pages and automatically Ping the search engines with new content. This is a great way to get your site properly indexed quickly. However it has additional “ninja” features you’re probably overlooking. We are going to use these features to help protect our essential pages from being indexed. The robots meta-plug-in will also assist with this task.
Robots Meta Plugin http://yoast.com/wordpress/meta-robots-wordpress-plugin/
Google XML Sitemaps Plugin http://www.arnebrachhold.de/projects/wordpress-plugins/google-xml-sitemaps-generator/
How to Hide Your “Secret Squirrel” Pages
My family playfully uses the term “secret squirrel” whenever someone is hiding information, acting shady or refusing to talk. It takes reference from a squirrel running around trying to hide an acorn.
Most websites have a lot of “secret squirrel” pages. When creating your sales funnel, you will primarily want your sales page and optin pages to be indexed and found in the search engines. Last I checked, however, no one wants their download, thank you, confirmation or one-time offer page indexed. These are your “secret squirrel” pages.
Important Note: I’m specifically creating “pages”, not “posts”. I always create pages because most themes do not have a single column post template. So going forward, everything is pages. No posts. Okay, let’s go…
- Install your plug-ins. You can find instructions at www.WordPress.tv.
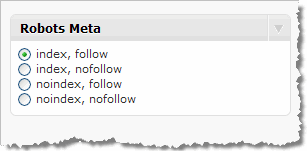
- Create your pages. Go ahead and create all your pages in whatever order you like. Once you finish writing the page, and right before publishing, look on the right sidebar. You will see an area called Robots Meta with the following options:
 Index/Noindex: This tells the search engine whether the page should be shown or not shown respectively. Use index for sales pages and opt in pages. Use noindex for all other pages.Follow/Nofollow: this tells the search engine’s whether links on the page should be followed and given “link love”. Usually, the only links on my salespage are the testimonials and I happily give some “link love” as an added benefit. (If you have an established site, this is a great way to acquire more testimonials.) All the other pages get the nofollow treatment.
 - Get the numbers. Open up Notepad, and jot down all of the page ID’s and their corresponding titles. You can find the page ID by logging in to WordPress and hovering over the page link in the Edit pages listing.
 In your browser’s status bar, you will see a number associated with that page.
 In the example shown, it’s “2”. Write it down, you’ll need for step four.
 - Configure your XML plug-in. With your numbers handy, jump over to the XML-Sitemap Plug-in settings area.
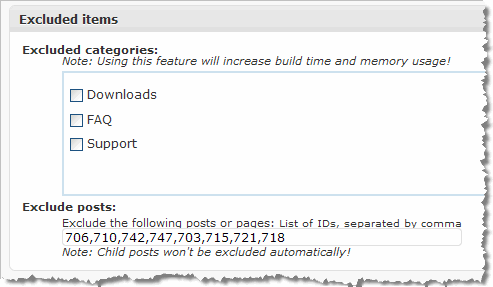
 Scroll all the way to the bottom. You going to find an area called the “Excluded items”.
 This is the place where you hide your acorns. You can check the categories you want hidden and you can type in the page IDs that should never appear in the search engines listings. Go ahead and write all of the page IDs separated by commas. Press update options, then scroll all the way to the top and click rebuild the site map. Done.
Link the Pages in Your Funnel Together
This is the final (and easiest) part. Using the WordPress editor, go back to your pages and link them together to create your desired sales funnel. If you’re using autoresponders, place the confirmation and thank you pages in your settings.
Final Thoughts and Warnings
That was it. Simple, right? No HTML or coding nightmares were involved.
Unfortunately, there is a slight problem. Your pages are only protected by a mechanism known as “obscurity”. In other words, they can’t be seen, but they can still be accessed. It’s the equivalent of throwing a blanket over a Christmas present in the closet. Nosy kids will find it.
Although your pages will not be found by search engines or other conventional, easy methods, somebody knowledgeable in WordPress can easily guess your page IDs, append them to the address bar, and run off with your acorns.
For this reason, I highly recommend you invest in some sort of secure protection for your WordPress site. There are many plug-ins available today that can lock down these pages by membership and username. This is the absolute best way to go. In the meantime, the methods above will help you get started quickly and easily.
Edit: I’ve received a few emails about this already. I once used Wishlist Member and S3FlowShield to protect my content and files using Amazon S3. Wishlist, however, started to slow down my pages. Now I use Nanacast to manage everything centrally for all my sites. It offers one central login area for all my products/membership, 1 click upsells, an affiliate program and a powerful coupon system. This lets me keep my WordPress sales pages running at full speed as lead generators. It also offers WordPress integration using their MemberLock plugin. 🙂

I loved this tutorial. I implemented the sales funnel pages and I’m fixing issues relating to full width display. I want the content to be 70% of full width.
I also added xml sitemap.
In the midst of contemplating whether or not I should buy two plugins to create a sales funnel, both of which required I go through the “FTP uploading hassle,” I opted instead to do a search for “free wordpress sales funnel” and found your article.
What can I say? You were right on target for my needs, wrote easy to follow step-by-step instructions, and saved me the cost of FTP “hassles.”
Thanky, thanky! You made my day! 🙂
Robin Carlisle